How to Test a Stator. If you own a motorbike or an ATV, you know how important it is to keep your vehicle running smoothly. The stator is a vital component of your vehicle’s electrical system that generates the power needed to run the engine and charge the battery. If the stator is not working properly, your vehicle will not start or will run poorly.
Knowing how to test a stator is essential for any motorbike or ATV owner. In this article, we will provide you with a comprehensive guide to diagnosing electrical problems in your vehicle’s stator. We will cover the most common symptoms of a faulty stator, the tools you need to test it, and the step-by-step process of testing the stator. So, let’s get started!
Table of Contents
Symptoms of a Faulty Stator
Before we dive into the testing process, it’s important to understand the common symptoms of a faulty stator. Here are a few signs that your stator may be failing:
- The engine won’t start or is difficult to start
- The battery won’t charge
- The headlights or other electrical components are dim or don’t work
- The engine stalls or runs poorly
- The spark plugs are not firing correctly
If you notice any of these symptoms, it’s a good idea to test your stator to determine if it’s the root of the problem.
Tools Needed to Test a Stator
Testing a stator requires a few specialized tools. Here’s what you’ll need:
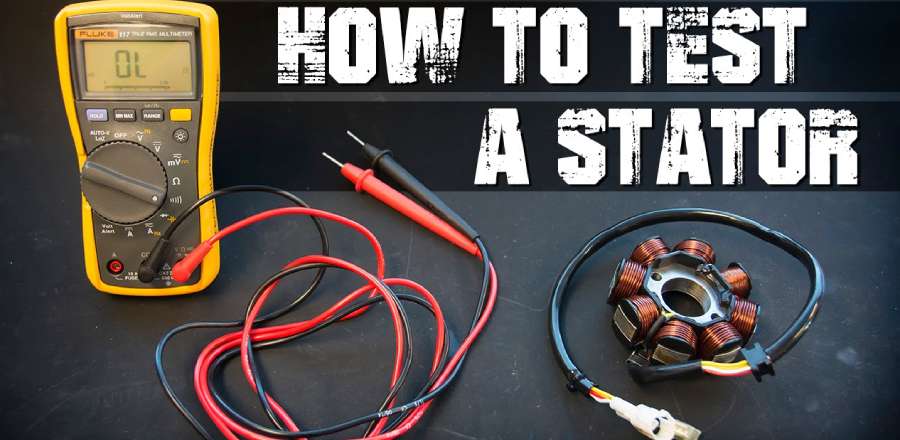
- A multimeter: This tool measures the electrical current and voltage in your vehicle’s electrical system. You can purchase a multimeter at any automotive store or online.
- A service manual: This will provide you with the specific instructions for testing your vehicle’s stator. You can purchase a service manual for your vehicle online or at an automotive store.
Step-by-Step How to Test a Stator
Now that you have the tools you need, let’s walk through the step-by-step process of testing your vehicle’s stator.
Step 1: Disconnect the battery
Before you begin testing the stator, make sure to disconnect the battery from your vehicle. This will prevent any electrical surges or shocks while you are testing the stator.
Step 2: Locate the stator
The stator is located near the flywheel of your vehicle’s engine. Refer to your service manual to find the exact location of the stator in your vehicle.
Step 3: Set the multimeter
Set your multimeter to the AC voltage setting.
Step 4: Test the stator
Connect the multimeter leads to the stator wires according to the instructions in your service manual. Start the engine and rev it up to around 5,000 RPM. Check the multimeter reading to see if the voltage is within the range specified in your service manual.
Step 5: Test the stator’s resistance
Set your multimeter to the resistance setting. Connect the multimeter leads to the stator wires according to the instructions in your service manual. Check the multimeter reading to see if the resistance is within the range specified in your service manual.
Step 6: Test the stator’s continuity
Set your multimeter to the continuity setting. Connect the multimeter leads to the stator wires according to the instructions in your service manual. Check the multimeter reading to see if there is continuity between all the wires.
Step 7: Interpret the results
Compare the results of your tests to the specifications in your service manual. If the voltage, resistance, or continuity are outside the specified range, then your stator may be faulty and require replacement. If all the readings are within the specified range, then your stator is likely functioning properly, and the issue may lie elsewhere in your vehicle’s electrical system.
FAQs
What is a stator?
A stator is a component of your vehicle’s electrical system that generates the power needed to run the engine and charge the battery.
What causes a stator to fail?
There are several reasons why a stator may fail, including overheating, wear and tear, and electrical problems in the vehicle’s wiring.
Can I test a stator without a multimeter?
It is not recommended to test a stator without a multimeter, as this tool is necessary to accurately measure the electrical current and voltage in your vehicle’s electrical system.
How often should I test my stator?
It is recommended to test your stator at least once a year, or whenever you notice any symptoms of a faulty stator.
How to Test a Stator: Testing a stator is an essential part of maintaining your motorbike or ATV. By following the steps outlined in this article, you can diagnose any electrical problems in your vehicle’s stator and take the necessary steps to fix them. Remember to always refer to your service manual for specific instructions on testing your vehicle’s stator, and use caution when working with electrical components. With a little knowledge and the right tools, you can keep your vehicle running smoothly for years to come.


